Following
the Route The
previous chapter
discussed the types of navigational situations encountered along the G.E.T. As
a brief review, most of the time the way ahead is fairly straightforward. Where
map and compass skills are useful or necessary, hikers would be well advised to
have a competent base of knowledge already in place to avoid being unduly slowed
down or disoriented. This goes for the use of GPS as well. Carry one, but know
its uses and limitations, and never let it be a substitute for traditional and
reliable methods of navigation. Remember that the G.E.T. is primarily a wilderness
route, and so demands a level of responsibility and self-reliance beyond that
of an Appalachian Trail hike, for example. You will probably be in the company
of few other hikers, and in the event of trouble may be on your own. Cell phones
may or may not work. Ranger stations may be miles away. Such are the risks and
rewards of a wilderness experience. The
Guidebook
The Grand Enchantment Trail
guidebook - a free online resource for trail users -
provides detailed descriptions for the entire route, including mile-by-mile directions,
GPS waypoints (named and keyed to the map set - see "Maps" below), information
on water sources, camping spots, and summaries of key features and highlights
along the way. This guidebook will likely prove very helpful in understanding
and following the suggested Grand Enchantment Trail route (although experienced
thru-hikers can often navigate solely by topo
map & GPS data in a pinch, such as for segments of the route not yet covered
in the guidebook). The guide has a printer-friendly web browser viewing option,
so you can easily print and carry just the pages you need into the field. Refer
to the guide at trail intersections, road crossings, and any time the way ahead
seems uncertain from map reference alone. Use it to plan each day of hiking, to
estimate how much water to carry, to know the locations of potential campsites
and the distance to the next resupply point. The
guide defines the route by segments - 39 in all - beginning in Phoenix and ending
at Albuquerque. Each segment covers a portion of the route, usually between road
crossings, most of which offer vehicle access to the route for the benefit of
section hikers or others with vehicle support. (Many of these roads, where they
approach the trail, do require a high-clearance and/or 4WD vehicle.) Each segment
description begins with a summary of features and conditions, which you can use
to quickly assess its highlights, challenges, and overall level of difficulty.
Thru-hikers would consider the conditions in all segments between a given resupply
point in order to determine hiking pace and how
much food to carry. Thru-hikers and section hikers alike may prefer to access
the guidebook via the Route
Overview page, (aka Narrated Overview) which offers a brief synopsis of the
route between each town stop and provides links to specific segment descriptions
within each span.
Maps
Detailed topographic maps
are absolutely essential for navigation along the G.E.T. Not only will such maps
help you to visualize the route, your location along it, and the terrain itself,
but they can also be invaluable in the event of a detour, whether voluntary or
involuntary.
Topographic
Maps and GPS Data
The Grand Enchantment Trail
topo mapset
contains over 100 richly-illustrated PDF maps, covering the entire route from
Phoenix to Albuquerque at a navigation-ready high level of detail. Each digital
topographic map is based on USGS 7.5' quadrangle data - the most detailed and
accurate available - and features additional information pertinent to the G.E.T.:
the route line, alternate routes and detours, mileage between features, GPS waypoints,
locations of potential water and campsites, detailed navigational pointers, and
other information as helpful. These digital maps are intended both for printing
at home and for carrying on a smartphone. For the most part, these maps are not
intended to be used in place of the guidebook, but to complement the guide and
to offer independent field reference at those times when only a basic confirmation
of the route is needed. Please note: The GPS
waypoints, as shown on the GET topo maps, are named and keyed to GPS waypoint
files (gpx file format) included with the mapset. This is to say, the maps
show only the waypoint names, which are shorter than the actual waypoint coordinates
and so easier to display on the maps with clarity. The waypoints files contain
the actual GPS waypoints and these can be used within smartphone navigation apps
or standalone GPS units to navigate with precision toward a waypoint as needed.
Note also that the online guidebook chapter descriptions reference waypoint names
and not actual coordinates. To obtain actual GPS waypoints for use in navigation,
one should obtain the most recent version of the topo mapset. The
G.E.T. topo mapset is available as a digital download. Click
here for more information and to order.
Other
Useful Maps
In addition to detailed
topo maps, you should also consider carrying broad overview maps for each area
along the route. Such maps will allow you to see the proverbial big picture, providing
the necessary information to make extended detours off the suggested route, for
example to avoid snow, high water, or in an emergency. I also find such maps essential
to my understanding of the landscape, and in this sense they heighten my connection
to the natural world around me. The
US Forest Service (USFS) and Bureau of Land Management (BLM) each produce large-area
paper maps of the lands they manage, and collectively these maps cover most of
the G.E.T. route. Again, these are intended as overview maps, and by themselves
usually won't be adequate for navigation along the suggested route. For example,
the scale of these maps generally lacks sufficient detail for trail hiking, (the
exception being USFS Wilderness maps) and none of these maps explicitly show the
route line of the G.E.T. (only the Topo Map Set does this). They can, however,
be particularly helpful in terms of their road detail and in showing the locations
of nearby towns and major travel roads. A
list of pertinent "paper maps" for the entire route is provided in a
handy, at-a-glance format here. Overview maps for
each segment of the route are also listed among the summary information within
each chapter of the online guide. You can generally order these maps online from
the Public Lands
Information Center. Other
useful overview maps include those found in the DeLorme
state atlases (Arizona and New Mexico), as well as state highway maps.
In-the-Field
Markings
 |
| Flagging
& Improvised Cairn, Black Range NM |
Since the Grand Enchantment
Trail is a free (suggested) route, it is not marked with permanent and official
"G.E.T." trail signs, blazes, or posts like the AT or PCT. The individual
trails and tracks that it uses, however, do often feature various marking
conventions, which differ from place to place in terms of style and frequency.
This signage may help in following portions of the G.E.T. route, but it is the
guidebook and maps that will keep you informed of each twist and turn in the route.
Use the guide and maps as your "virtual trail blazes."
Cairns - piles of rocks
that serve as markers - are sometimes encountered along the route, such as at
road or trail junctions in open terrain. Most are part of an existing trail's
blazing convention. As with other types of marking, use cairns primarily to confirm
that you're on the route detailed in the guide.
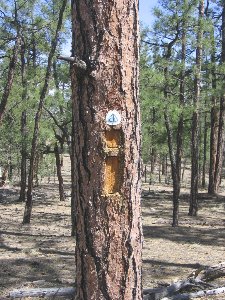 |
| Rectangular Tree
Cuts, or "i-Blazes," CDT/GET |
A common method of marking
trees on Forest Service trails is a pair of rectangles, one atop the other,  cut
from the tree's outer bark. The upper cut is smaller than the lower, so that the
mark resembles a lower case letter "i.". Older marks tend to become
less conspicuous as the tree heals over, but any evidence of these "i-blazes"
is a sure sign that you're on trail. Whether or not it's the right trail is, again,
a matter resolveable through guidebook and map. cut
from the tree's outer bark. The upper cut is smaller than the lower, so that the
mark resembles a lower case letter "i.". Older marks tend to become
less conspicuous as the tree heals over, but any evidence of these "i-blazes"
is a sure sign that you're on trail. Whether or not it's the right trail is, again,
a matter resolveable through guidebook and map.  The
Arizona Trail and Continental Divide Trail each have their own blazing conventions
and emblems. Look for such blazes on the portions of the G.E.T. that use these
trails. The
Arizona Trail and Continental Divide Trail each have their own blazing conventions
and emblems. Look for such blazes on the portions of the G.E.T. that use these
trails.
A
Word About Mileages
Please be aware that all
mileage figures listed in the guidebook and on maps are estimates only. The mileage
breakdown by surface type described earlier, mileage per segment and between town
stops, and total miles for the route have all been determined via either GPS or
by map measurement, and have not been verified precisely (wheel method, etc.)
Trail and road signs encountered along the way may sometimes conflict with stated
mileages in the guide and on maps, and generally it is impossible to determine
which is most accurate, other than by gut feeling after walking it. An
ongoing effort is to record the distance of the G.E.T.'s individual segments via
GPS equipment. This is the most accurate method which is practical for the backpacker
to use in the field while hiking extended distances, and the results are indeed
much better than map-derived mileages overall, though still imperfect. As of this
writing a majority of the route's segment mileages are GPS-verified, with the
notable exception of the shared CDT corridor in the Black Range of New Mexico
and a few short areas elsewhere along the route. For these non-GPS-verified portions,
mileages instead are based on measurement by software. The G.E.T. 7.5' topo map
set was developed using National Geographic's TOPO! mapping software for Arizona
and New Mexico. This software allows for an acceptable level of precision in determining
distances along a plotted route, however it can only measure the route line itself,
which can never be drawn with the same detail as the actual roads and trails that
it represents. In a sense, all map features, and indeed GPS tracks, are conceptual
representations of their real-world counterparts, and thus the herculean efforts
sometimes undertaken to measure and "wheel" long-distance hiking trails
in-the-field - up and over every rock, around every turn, and between each tree. It
is my considered opinion that the stated mileages, though imperfect, follow a
predictable pattern. And it is this predictability that allows for reliable planning
and assessment throughout the day of hiking. The rule of thumb is that mileages
along singletrack trail sections of the route almost always tend to feel a little
underestimated, while distances along roaded sections seem to ring true. What
this means is that once you get a sense of what "5 miles" means on trailed
portions of the G.E.T., you will be able to trust your "mileage instinct"
for the duration of the hike, particularly when factoring in local conditions
and terrain as detailed in the guide.
How off the mark might the mapping software-derived singletrack mileage figures
be? My sense is that they may under-represent actual mileages by as much as 5%.
The GPS-derived mileages are generally accurate to within 2% or better, and since
a majority of the route now features GPS-derived mileages, there is less consequence
for daily hiking mileage estimates than might be imagined.
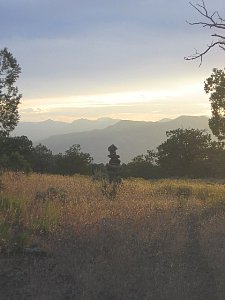 |
| Cairn
& autumn grama grass, Blue Range AZ | |


